How To Play With Killer Guitar Phrasing – Part One


By Nick Layton

Stop working ONLY on guitar technique! To play guitar solos and improvisations that sound really kickass you must also improve your guitar phrasing. For most guitarists, guitar phrasing is a foreign term… which is really sad. Truth is, playing with great technique does not translate to playing great sounding ‘music’. To begin playing great solos you only need to start with a single note. From there, you can expand to play some truly awesome stuff! Let me explain:

Being great at guitar phrasing means being able to clearly communicate your thoughts and emotions as you play – similar to how you would have a verbal conversation with someone to express yourself. You’ll never get the attention of your listeners by speaking in a monotone voice, and this same concept applies when it comes to your guitar playing as well. You must learn how to use various phrasing nuances to express yourself with only one note if needed, and more notes in other situations. The most important thing to understand about phrasing is HOW you play your notes (not the notes themselves). Here are the three critical guitar phrasing elements that truly great guitarists possess:

Vibrato:

Vibrato technique is very personal to the guitarist using it, so it is crucial that you create your own unique playing style with this element. Contrary to what many guitarists think, vibrato requires years of practice to perfect (both technically and stylistically). To get started playing with good vibrato for yourself, think about how you want to hear it played. Listen to how vibrato is used by your favorite guitarists whenever they are playing solos. Then go online and find videos of these guitarists playing live, so you can see how they move their hands to create vibrato. Next, do your best to imitate their style in your playing. Eventually, you will begin developing your own style (as you mix together the different styles of your favorite guitarists). As you work on your vibrato, remember this: There are tons of different ways to play vibrato. For example, neoclassical guitarist Yngwie Malmsteen has a slow and wide vibrato, while blues guitarist B.B. King has a very fast and narrow vibrato. Think about what sounds best to you, and focus on developing that sound within your style. To get started improving your vibrato technique, practice using it while playing over backing tracks or during your favorite songs. If you want to develop your vibrato much more quickly, work together with a good guitar teacher. Additionally, remember to use vibrato on bent and unbent notes.

String Bending:

Every guitar player who has good phrasing skills understands how to use string bends in a highly creative manner. When you are able to put together a solid string bending technique with great vibrato, you will truly start playing creative and expressive guitar phrases. The best part about string bending is there are endless approaches to bending notes. For example, you can bend by 1/2 step, by whole step, by less than 1/2 step (microtonal bends) or use techniques such as ghost bends, vary the speed of your bends and so on.

A great example of a virtuoso guitarist with unique string bending technique is Marty Friedman. Rather than using a conventional approach to bending strings, he often starts his bends from a note that is outside of the key and moves the pitch of that note to where it becomes ‘in key’. This creates a very distinct and exotic sound that is a clear marker for Friedman’s style. Simply put, a creative string bend will make any note stand out to anyone listening.

Additionally, keep these points in mind:

First, you must make sure you are always keeping your bends in tune. If you release your bends a little too flat or sharp it will be very obvious – and it will NOT sound good! This is a very common mistake that most guitar players make. Work together with a guitar teacher who can hear whether you are in tune or not and keep your playing on the right track.

Second, don’t use the same types of bends all the time. Begin by playing half step bends and move on to include various other types, such as ghost bends and varying the rate at which you bend the string. Work to perfect each type with all fingers on your fret hand. Support the finger that is doing the bending with any remaining fingers you have available, to gain better control.

Third, pay close attention to the bends of your favorite players and copy the licks they use to get a feel for their style. Then work with a guitar teacher to get help with applying your bends into a musical context as creatively as possible.

Ornamentation

By using ornamentation in your guitar playing, you can make every note massively more creative and interesting for the listener. Ornamentation is the general idea of using techniques to ‘embellish’ a note.

One way to do this is to use a trill. Trills are (generally speaking) rapid alternations between one note and another using hammer ons and pull offs. Trills were commonly used throughout the Classical music era and have also been used in rock music by many guitarists. The main idea here is to add more interest to the way you phrase your notes, so that they are always attention-grabbing. Another way to embellish your notes, is to play artificial harmonics with your pick. A great artificial harmonic can create a screaming effect, causing your notes to sound much higher in pitch. This will make them stand out from the other notes you are playing. Additionally, using your fingers to create natural harmonics over the fretboard can sound very creative (especially when combined with a tremolo bar). There are endless other embellishing techniques that could be discussed – however, these ones are a good start. It’s more important to master a few ideas first, so that you don’t overload yourself with too much information at once.

In this article, you’ve only learned three main elements of great guitar phrasing. In part 2, you will discover additional elements to help you improve your lead guitar playing.

Learn how to apply everything you read in this article by studying this free guitar solo phrasing lesson.

p> About The Author:


Nick Layton is a professional guitarist and guitar instructor. He has also written many guitar phrasing improvement courses.

How To Play Badass Guitar Solos Part 3: Expressing Emotions In Your Solos

By Tom Hess

If you are like most guitarists, you don’t know how to play emotional guitar solos. Fortunately, it’s easier to do than you think. Let’s test your current knowledge…

Choose one pair of notes that has the most similar ‘feeling’ to one another:

Pair #1: a C major chord in the rhythm with a G note being played over it in the lead – immediately followed with an E minor chord and a G note played in the lead.

Pair #2: a D major chord in the rhythm with an A note being played over it in the lead – immediately followed with an G major chord and a D note played in the lead.

If you are like many guitarists, you answered the first pair as the one that sounds most similar. However, this answer is way off! Here is why this answer is wrong:

Pair #1 has a G note being played over both the E minor and C major chords. Although the same pitch (G) is being used, this pitch does NOT sound/feel the same when played over each chord. The reason why is the G note is functioning differently: It functions as the fifth over C major and the third over E minor. The fifth and the third sound completely different.

On the other hand, the A and D notes in pair two actually ‘feel’ exactly the same (in spite of being different pitches). This is because they are both fifths – A is the 5th of a D major chord and D is the fifth of the G major chord.

To hear tons of examples of this, so you can fully understand this concept, check out the video below:

How To Quickly Make Your Guitar Solos Sound More Emotional Using This Concept

First, download the .mp3 file below. This .mp3 is simply made of a single note (E) that is played continuously for four minutes. Use this file to complete the steps below:

Click this link to play the audio sample

First Step: Allow the E note backing track to continue playing while you play these chords on top of it (let each chord sustain for 5-10 seconds): B major, F major, F# minor, F# major, E major, E minor, A major, A minor, C# minor, C major, D major, D minor. Imagine this like playing a single note guitar solo above every chord.

Second Step: If you already know how to build chords, you understand that the E note has an entirely different function when played above each chord from the first step. The next step is to figure out the function of the pitch as it is played over each chord. Here is an example: If you notice that you like the way an E note sounds while being played over a C# minor chord and you know that it is functioning as a ‘third’, you will recognize a third whenever you hear it being played over any minor chord. As you found out by watching the video above, the function of a note will always feel/sound the same no matter which note or chord you are using.

With this in mind, it is important to learn how to recognize the sound of other note functions as well (not just your favorites). However, you should begin by identifying the ones you like first, then expand and learn the others.

If you aren’t familiar with chord construction, do this:

  • Pay very close attention to how the E note above ‘feels’ when it is played over the different chords from the first step. After you learn more about music theory, you will be able to understand more about why each chord creates a totally separate feeling over the same note. This will help you apply the information so that you can create emotional guitar solos any time you pick up your instrument. For now, simply get accustomed to the different feelings that occur when the E note is played over each chord change.
  • Study with a great guitar teacher to learn more about music and quickly reach your guitar playing goals.

Third Step: Clearly identify the particular emotions that are created from each pitch function from above. Simply identify the emotions YOU feel – don’t worry about whether or not you have identified the ‘correct’ emotion. Start by asking yourself how it feels when a third, fifth, root, etc. is played over a certain chord (minor or major). This step is critical as it will help you memorize the unique sound/feeling of each function. This is essential for being able to play emotional guitar solos.

Once you have taken the steps above and have a solid grasp on the ‘feeling’ of each note function, begin seeking new ways to apply this idea into your guitar soloing. One exercise you can use to do this is to analyze the notes in the chords of the backing tracks you usually play over. Identify which note goes with which chord and find out what notes the chords have in common.

For example, imagine that this is the chord progression in your favorite backing track: E major, C# minor and G# minor. The E note is present in both the E major and C# minor chords. E functions as a root in E major and a third in C# minor. In addition, the G# note functions as a root over G# minor and a fifth over C# minor. If you were to solo above these chords, it would be to your advantage to use the common tones in each chord (as tools for easily changing the emotion being expressed). One way this is done is to sustain the shared notes over the chord change. This will instantly surprise anyone listening by generating a completely different emotion as the note is changing its function.

Of course, you should not ‘always’ be using this method in your solos. Doing this all the time will cause your soloing to become predictable and stale.

Although the concept you learned in this article IS very powerful and will help you improve the quality of your guitar solos… it is only the beginning! If you really want to become a killer lead guitar player, you must master the ability to make your listeners ‘feel’ exactly how you want them to feel with every note you play. Learn how by reading this page about creating intense emotion in your guitar playing.


About The Author:
Tom Hess is a highly successful guitar teacher, songwriter and a pro guitarist. He uses the best online guitar lessons to train guitar players to reach their musical goals. Go to tomhess.net to get more guitar playing resourcesguitar playing eBooks, and to read more guitar playing articles.

How To Develop Faster Guitar Speed – Pt. 5: Why Conventional Speed Building Advice Fails

By Tom Hess

Most guitar players commit huge errors that keep them from becoming faster. These errors often include the following:

1.As they try to train for higher speeds, a lot of guitarist spend a big percentage of their practice time on ‘slow’ practice (usually after being advised to do so by a guitar teacher). They believe that by practicing slow all the time (and being able to do it perfectly) they will increase their max speed. It’s no wonder that guitar teachers who teach this approach to their students never end up with guitar students who play fast.

2.Some guitarists only want to play fast because they feel impatient while practicing slowly. This leads them to ‘try to play as fast as possible’ every chance they get. They believe that working on increasing their top speed every day will eventually help them play faster.

99% of the time, these two approaches will NOT build serious speed. This is because both methods suffer from significant problems that are never addressed (by almost all guitar teachers). Additionally, spending too much practice time playing exclusively fast/slow causes big problems in your technique (even if you are unaware of it). To effectively build speed on guitar, you have to fully know ‘when’ and ‘how’ to use BOTH practicing styles together to make up for the shortcomings of the opposite approach.

Now you will learn why you will not increase your guitar speed by always playing ‘fast’ or ‘slow’ and which approaches you should be taking instead:

Why You Won’t Become A Faster Guitarist By Always Practicing At Slow Speeds

Reason 1:You Take On Poor Playing Habits That Keep Your From Becoming A Faster Player

When you are only practicing guitar slowly, you are prone to forming bad habits by using extended, inefficient movements that are entirely different than the movements used while playing quickly. When you have more time between each note, it is hard to notice inefficiency in the movements of your hands (because you can still play the notes right since you are playing so slowly). Then whenever you play at faster speeds, you try to implement the same inefficient movements into your playing and everything falls apart.

Here are two very common examples of this that I see while helping my newer students become better players:

  • They try to pick each ‘individual’ string within a sweep picking arpeggio pattern instead of using a single sweeping motion to move across all strings simultaneously
  • They play 3 note per string scale patterns with continuous alternate picking technique. This involves excessive and unnecessary picking motion, leading to slower playing and general sloppiness. Watch this video about learning how toplay guitar fast and learn more about this issue so you can fix it.

Reason 2:You Don’t Understand What Is Keeping You From Playing Faster

In order for slow guitar practice to make you a faster player, you need to understand the problems (inefficient movements, lack of two hand coordination, etc.) that are currently getting in the way of you becoming faster. Until you pinpoint these things, your time spent practicing slowly will just be a waste of time. You’ll merely be guessing about what you should be working on – making extremely slow progress at best. In order for you to truly KNOW what to fix, you need to spend some time playing at higher speeds and observing when/why any mistakes happen. Only after you’ve done this should you begin practicing ‘slow’.

Trying to practice slowly without knowing exactly what you should be fixing is like running across a balance beam with your eyes closed and your hands tied behind your back while trying to maintain your balance. Open your eyes and untie your hands by learning what you need to work on to build speed BEFORE practicing slowly.

Learn more about this process by reading the fourth installment in this article series about developing guitar speed.

Reason 3:You Can’t Mentally Process Notes At Faster Speeds By Playing Slow All Of The Time

To play guitar at the highest possible speed, you have to posses the ability to comprehend notes at the same tempo (or faster) that you are playing on. If you never practice at fast speeds, you will never improve your ability to mentally comprehend the notes in a way that is necessary to play cleanly at higher tempos. This will result in sloppy playing at higher speeds and a lack of ability to follow the tempo in faster music.

To keep this problem from affecting your playing, you must train yourself mentally to process the notes at faster speeds. Train yourself to do this by studying the information in this free guitar speed training mini course.

Why ‘Always’ Playing At Your Highest Speed (With Less Than Perfect Precision) Will Damage Your Ability To Play Fast

Now you understand why practicing guitar slowly all the time will not help you become a faster player. However, it’s just as ineffective to exclusively play at fast speeds (when you haven’t fully mastered what you are playing yet). Here’s why:

Reason 1:You Increase The Chances Of Wrist/Arm Injury

A major drawback to playing fast with mistakes is the injuries that can occur from poor, under-developed playing technique. Poor playing technique comes from not learning how to play efficiently/correctly at slower speeds so that you don’t use excessive force or movement at higher speeds. This is serious: I’ve seen many guitarists hurt themselves from continuous playing at high speeds – resulting in many months of recovery time away from guitar.

To avoid this, stay alert of ‘where’ and ‘how much’ tension is being used in your body as you play faster (you can only notice this during fast guitar practice). Once you spot unnecessary tension being used in your body, start playing again at a slow speed while only using as much tension as you need to sound the notes. Once you’ve done this, increase the speed again while using optimal tension.

Notice: If you begin feeling pain while you are playing, STOP! Take a break for the day and come back to playing another day when you can play without any discomfort.

Reason 2:Your Guitar Playing Becomes Sloppy

By exclusively playing fast, you will not be able to mentally process notes just like exclusively playing slow will keep you from being able to process notes at faster speeds. This applies specifically when you are playing at faster speeds for a long time while making numerous errors. This causes you to ‘tune out’ the mistakes you are making and accept them as a normal part of your playing. In other words, you train yourself to become a sloppy player! I frequently see this happen when new guitar students approach me for help. The first step I take to help them build their playing speed is pointing out the errors in their playing that occur at fast speeds. Next I train them to become aware of these errors so they can fix them on their own. This is a big reason why a lot of my students quickly go on to become really good guitar players.

To make sure you don’t become a sloppy player, focus your practice time on creating a balance between playing slowly with perfect accuracy and playing fast to master the skills that only faster practicing can build. Learn many strategies for this by checking out part one of this guitar speed development article series and part 2 to learn an effective guitar speed training method.

Now you know the main issues that occur while practicing with conventional guitar speed building approaches, check out this video to see how you can implement the advice in this article to become a faster overall player while improving your sweep picking:

<iframe width=”420″ height=”315″ src=”http://www.youtube.com/embed/DAxjY8UeTaI” frameborder=”0″ allowfullscreen></iframe>

Watch the second half of this video about how to play sweep picking arpeggios.


About The Author:

Tom Hess is an online electric guitar teacher, recording artist and virtuoso guitarist. He trains guitar players from around the world how to reach their musical goals in his correspondence guitar lessons online. Visit his website tomhess.net to receive many free guitar playing resources, mini courses, guitar practice eBooks, and to read more articles about guitar playing.

Use Blues Guitar Double Stops Technique To Play Creative Licks

By Tom Hess

Every great blues guitar player is able to play with a mean double stop technique (when two notes are played together at once during a solo). In most cases, guitarists use the notes of the blues or minor pentatonic scales. Check out the example below to see some double stop patterns that are frequently used in blues guitar.

Hear It

On their own, these double stop licks sound interesting, however most guitarists are unable to creatively apply them into their playing because:

1. These types of double stops are very common and have been used countless times by blues guitar players. This makes your playing sound very unoriginal if you use them too many times.

2. Most guitar players equate using double stops with using one of the patterns above and never think of new ways to apply to apply them in a blues setting. Soon, you will learn just how many options you have for personal expression while using double stops (it’s a lot more than you think).

3. The unique intensity created by double stops is usually resolved as both notes in the lick are played in unison after the bend is finished. This takes away from the expressive potential of the technique to sound extremely intense and aggressive.

In a moment you will learn the main elements of a highly creative blues guitar double stop. Before reading this, check out the demonstration in the video below in order to get the greatest benefit from this article:

Now that you have checked out the video above, read the information below to learn the specific elements that make double stop licks sound creative and intense:

Intense Blues Guitar Double Stops Element #1: Using various notes of the scale

The most widely used blues double stops licks are played in a way that uses two notes to basically emphasize the same exact note (as shown in the video above). A more interesting way to use double stops is to use different notes in the scale you are playing. Listen to this in the examples below:

Hear It Hear It
Start by picking the note on the G string and bending it. Then play one of the notes on either the B or E string to compelte the double stop. When you add this additional note into the lick, this is what makes it sound so intense and aggressive.

In the first example lick of the two from above, you can allow the B string to ring with the other two notes since it is in the same key. However, while playing a double stop in other keys, you will need to mute the B string using the fingers of your picking hand so that it does not create unwanted noise (making your lick sound sloppy/bad). Learn the best way to do this by reading this column on how to effectivelymute guitar string noise.

Creative Blues Guitar Double Stops Element #2: Extended musical tension

In general, blues double stop licks start with a tense feeling created when two notes a whole step apart sound simultaneously before the lower note is bent to match the pitch of the higher note (relieving the tension). In the video above, I did not follow this general approach – I did the opposite. I first playerd a normal note from the scale. Next, I played a note together with it that clashed and created a lot of musical tension. The tension created by this effect was never completely resolved (until I stopped playing). This is a very creative way to make your blues licks sound extremely intense.

Intense Blues Guitar Double Stops Element #3: Wide Vibrato

Most players think of using vibrato ‘only’ to emphasize single notes in their guitar phrases. By adding vibrato to both notes in your double stops, you will make the lick sound incredibly intense and creative. To hear the difference between these two approaches, listen to the example below. The first part of the audio doesn’t use vibrato, while the second emphasizes both notes using vibrato.

Hear It

Notice: In order to apply balanced vibrato to each of the notes in the double stop lick, you need to have solid vibrato technique and/or use either a floating bridge or whammy bar. Keep your lick in tune and mute any strings that are not being played to prevent it from sounding sloppy. Learn how to keep your blues licks from becoming sloppy while playing with intensity by checking out this article about playing blues guitar.

Advanced Blues Guitar Technique: Using a barre to create more notes

To add an additional layer of depth to your intense double stop lick, use a barre to play more than two notes at once (as seen in the video above). An easy way to play this is to bend the note you are using on the G string and play 2 additional notes on the B and E strings. For instance:

Hear It

You can use your third finger or small finger to barre the two notes on the B and E strings above.

Here are some additional examples of what this sounds like:

Hear It Hear It

In order to apply vibrato to these advanced double stop licks, you will need to use a guitar with a floating bridge by pressing back and forth on the bridge with your picking hand (as seen in the video above). However, if you don’t own a guitar with a floating bridge, that is fine too. You can still implement the concepts discussed in this article to enhance your blues guitar playing.

To quickly get good at using the types of double stop licks in this article, practice them in isolation first before using them in your improvisation or lead guitar phrases. Then while you are soloing, use them to inject tons of intensity into your phrase.

After working on the ideas in this article for a while you will easily be able to apply blues guitar double stops into your phrases. But remember: knowing how to play cool blues guitar licks is just the beginning to becoming a great player. Discover how you can become a much better guitarist in all areas of your playing by studying this free guitar practice guide.


About The Author:
Tom Hess is a highly successful guitar teacher, songwriter and a pro guitarist. He uses the best online guitar lessons to train guitar players to reach their musical goals. Go to tomhess.net to get more guitar playing resourcesguitar playing eBooks, and to read more guitar playing articles.

Tom Hess is our resident author, for other information including how to become an online guitar tutor go to http://www.internet-guitar-lessons.com/blues-guitar.html


The Secret To Playing Killer Blues Guitar Licks Part 2

By Tom Hess

This article is a continuation of the first part in this series about creating blues guitar licks. Before you read any further, make sure you fully understand the ideas discussed in part 1. To speed this process up, simply watch this short video about how to play blues guitar licks.

You are now going to learn how to use the muting technique you mastered together with additional blues guitar phrasing techniques that will make your playing much more expressive and creative.

To get started, watch the video below and observe how to perfectly use the techniques I will be discussing:


After watching the video above, you now have a clear understanding of how to use the following ideas to enhance your blues guitar licks:

Step #1:Quickly create a short blues guitar lick that you can easily play several times without making mistakes. Make this lick contain no more than two to five notes. By using only a few notes, you will enable yourself to get the maximum amount of expression possible when you use the techniques discussed below.

These are a few samples of the types of blues guitar licks you could create (I have not included the rhythm here – it’s up to you to be creative with the rhythms you use):

Example No.1 Example No.2 Example No.3

Notice: the licks I have provided for you above are NOT complex (on purpose). I want you to focus heavily on the techniques mentioned below in order to make these ‘plain’ licks sound totally KILLER. Watch the video above again to see how you can do this.

Step #2:Once you can very easily play through your lick several times, use any of the following techniques to enhance it. Do this one at a time, beginning with technique 1, then technique 2 and last technique 3. Re-watch the video above if necessary to see how these techniques should be used.

Technique Number One: Sliding Ornamentation:

Select any note within your blues lick and use the finger that was fretting it to quickly slide up 3-5 frets or so and return back to the original fret before continuing the lick. Don’t focus too much on the specific amount of frets you are sliding to. Instead focus on enhancing your lick with the unique sound that is creating while using this technique (rather than trying to pinpoint a specific note to slide to). When you apply this slide to a note in your lick, it will greatly increase the overall level of expressivity in your phrase. After you have become comfortable with this technique, come up with several variations of your original lick by applying slides to the other different notes within it. There are many ways to implement this idea into your playing (each one sounding more interesting than the previous one).

Technique Number Two: Delayed Vibrato

Emphasize the notes within your blues lick by using heavy (delayed) vibrato to make them sound more intense. The longest held notes will usually be the last notes of the phrase. The key to making this technique so effective is waiting to apply vibrato until a few moments pass after you’ve played the note you want to apply it to. Then apply the HEAVIEST vibrato you can perform! This vibrato in combination with a slight delay will increase the intensity of your lick by tenfold due to the anticipation that is created in the process. Work on this technique for several minutes until you have comfortably integrated it into your blues lick, then make several variations of your original lick that incorporate delayed vibrato into the notes for by varying the amounts of time you wait before applying it.

Technique Number Three:Slow, Crawling Bend

After playing the penultimate note of your blues guitar phrase, ‘slowly’ bend the note up to the last note in your lick. This will create massive tension that will make your phrase much more intense. Important notice: this bend will be MOST effective when you ‘delay’ it and will lose its effectiveness if you simply bend up to the note immediately after playing it (check out the video above again to see how long this bend needs to last). Then once you reach the target note with your bend, strike the string with tons of force! After you’ve mastered this, improvise several more variations of your original lick using bends in this manner.

Step #3:After trying out all of the techniques above and creating many variations of your original lick, repeat the process again using a totally new lick. This will help you think of endless supplies of new blues licks because there are many different ways to use the techniques to create innovative and unique phrases. Push yourself to think of as many variations as possible while focusing on just a few notes. Notice: I told you to try all three techniques with one at a time in order to make sure that you get the maximum amount of expression from every technique. This can be difficult at first, but it will MASSIVELY enhance your blues guitar creativity.

Listen to a demonstration of several phrases I’ve made from the techniques discussed in this article.

Once you’ve gone through the steps of this article, you will quickly gain the ability to play killer blues guitar licks at will. However, there is much more to be learned – watch this video about how to improve lead guitar playing and find out how to use rhythm to become an even more creative lead guitarist.


About The Author:
Tom Hess is a professional touring musician, recording artist and online guitar teacher who teaches guitarists from all over the world in his online guitar lessons. On his website, tomhess.net, you can get additional free tips about guitar playingguitar playing resources, mini courses and surveys.

Tom Hess is our resident author, for other information including how to become an online guitar tutor go to http://www.internet-guitar-lessons.com/blues-guitar.html


9 Good Reasons to Not Use the CAGED System for Guitar Scales

 Tommaso Zillio


You have probably heard of the CAGED system for learning guitar scales. In fact you may actually be using it, so let me ask you a question: do you feel like you are mastering the fretboard completely? It’s incredible how many times I hear a negative answer to this question, followed hastily by: “but it’s me, not the CAGED system. I just need more practice”. Well, I have learned the CAGED system too, and I found that it’s actually the system to have some problems that prevents guitar players to reach their full potential. If you want to save yourself years of frustration, keep reading.

The CAGED method is now so ubiquitous that many musicians think it the only existing method to learn how to visualize the fretboard. I know at least two local guitar players in the city where I live that teach the CAGED system to their student even if they personally are not using it. Both of them, when questioned about it, answered that they used for themselves a method they invented but were teaching CAGED because “it’s the correct method”. If the method is “correct” whey don’t you use it? Why do you need to invent a new one? The answer is that, as we will see below, the CAGED method has a number of problems in practical applications.

These problems are why most players are confused or frustrated by “scales” or “music theory” on guitar. The problem is not that these topics are difficult, but that the system used to teach them is either limiting you or making thins more difficult. The real problem with the CAGED system, as we will see below, is that it’s making you doing a lot of work, so you have the feeling that you are learning something or understanding better, but at the end of the day you are not able to do the things you needed to be able to do. Below I explain this in detail so stay with me.

There is no integration with arpeggios…

Every time I talk with a CAGED apologist, the very first thing they tell me is that their system integrates scales and arpeggios. This is not true. What it’s true is that the scale patterns are superimposed over a major chord shape, but these shapes are not always usable as arpeggio patterns (see below). The only advantage seems to be that they are similar to the open strings chords most beginners know, but that’s about it.

So, what I mean with “not usable”? I mean that the shapes shown for the chords are difficult to play cleanly and fluidly compared to other shapes such as the standard “sweep arpeggio” shapes. This is partially because some of the shapes are good only for few strings: for instance the “G shape” does not cover strings 2,3, and 4: these notes must be borrowed from the “A shape”, but the resulting pattern is not easy to play as an arpeggio. The “D shape” covers only the first 4 strings, and so on. In all these cases the arpeggio/scale integration seems good visually, but it not as convenient mechanically. Try just to play the scale pattern ascending and then descend using the arpeggio without stopping to see what I mean.

… and only MAJOR arpeggios at that

All the CAGED scale patters are shown, as I said above, together with a major chord shape. You may notice that it is quite less common to show them with a minor chord shape, and there are practically no diagrams out there with a diminished, augmented, or altered chord. Even the seventh chord patterns are rare.

This is no chance: with minor chords the CAGED scale patters look already less attractive, as the shapes for the minor arpeggios present more technical difficulties (compare them with the standard “sweep arpeggio” shapes to see what I mean). It’s even worse for diminished, augmented, or altered chords.

When I ays this in conversation many CAGED supporters raise their shield and “inform” me that you can of course use the CAED patterns on minor chords. Well, I didn’t say you couldn’t, I just said that it is more difficult. I am sure that if you throw enough practice hours at this problem then you can do it — the question is if there is a simpler system or not.

Just one recommendation on this point. I have seen a number of authors recommending to use the “relative major” shapes on minor chords, for instance to solo on the Am chord they use the C major scale shapes. Patches like this have the result of making the system even less intuitive, make it more difficult for you to solo “in” the chord (because a C chord and an Am chord are not the same chord…), and do not ultimately address the problem of all the other chord types anyway.

It is inferior technically

It is not a mystery that most shredders do not endorse the CAGED system, and for a very simple reason: because it is difficult to play scales at high speed using these scale patterns.

You may or may not be into shred and fast playing, but it is a fact that if a scale patterns make it difficult for you to play at a high speed, then it is putting an unnecessary technical burden on your playing at any speed. Or in other words: stuff that can be played faster is usually easier at any speed.

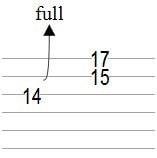
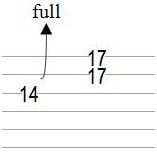
The reason why CAGED patterns are more difficult technically is that they are not consistent in the number of notes they have per string: some strings have 2 notes, some 3. This is because CAGED patterns are derived from the principle used in classical guitar playing of “one finger per fret” — and this is all good but this principle is NOT helping you to play electric guitar (that is a different instrument than classical guitar, goes without saying). A better option, that will make easier to play also melodic patterns (“sequences”) is to lay down your scales with 3 notes per strings.

Another technical problems most CAGED users but the most advanced tend to have is that they stay in “position playing” i.e. they never move from one position on the fretboard. Needless to say, this reflects on the quality of their soloing.

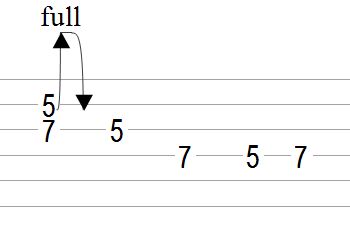
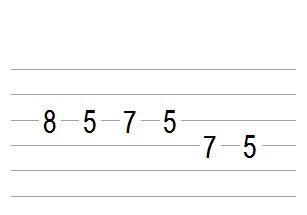
To realize how the CAGED system is technically inferior, I suggest the two following three exercises: 1) try and play the scales as fast as possible. 2) Try to play a scale sequence such as: C, D, E, D, E, F, E, F, G, etc… 3) Restrict your playing to only the first two string, and play the scale patters all across the fretboard. In all three cases you will see that the CAGED system produces some awkward fingering when the scale pattern passes from 3 to 2 notes per string.

It is too scale-centric

Every CAGED method I have seen shows the scale patterns superimposed with the chord patterns, often with the comment that “this is how you integrate them”. Literally all the method I have seen, though, have you play these scales… but virtually none have you play the arpeggios. As a result most players that use the CAGED patterns have a scale-centric view of the fretboard: everything comes from, or is reduced to, a scale, and since this is the center of their approach this is also the thing they play most in real playing situations.

You may have heard or read online the advice that you should “not learn scales as they are bad for you”. I have also heard this phrased as “scales are stupid”. Of course I don’t agree with that: you should learn your scales. But there is a grain of truth in these comments: you should not learn ONLY scales. You should learn ways to break free of the scales whenever you need. But especially you should not rely on systems that make it difficult to play anything but scales.

There is lots to learn by heart

I hear often that in the CAGED system “you need only to learn 5 patterns an then you are done”. Well, I could point out that this is not true at all (see next point) but for now let’s concede it: you just need to learn 5 patterns. Sounds good, no? But what if I told you that in other scale systems, such as in the 3-notes-per-string system (if taught correctly) you need to memorize ONE pattern — not 7 like most people think. I don’t have the space here to go in depth into that, but if you are interested in how is this possible let me know in the comments and I will write an article on the topic.

There’s more. In order to use a scale pattern to its full power, you need to know more than just the pattern: you need also to know what scale degree is represented by each note in the pattern: which one is the root? which is the fifth? and so on. Since the CAGED scale patterns lack intervallic regularity then you need to learn the scale degrees separately for each of the 5 shapes. You will agree with me that this is not as attractive as it seemed at first sight…

It makes difficult to use different scales

“So you learn these 5 patterns and you are set for the major scales and its modes”. “Ok, but what if I want to use something different, like the melodic minor scale, or an exotic scale?” “You can see it as a variation of the major scale”. Ok, well, this is technically true. Any scale can be seen as a “variation” on the major scale, simply because if you change enough notes you can obtain any other scale. But is this a goos way to think?

I think the real problem is if we it is convenient for us to think of the new scale in term of the major scale. And the answer is: often this is not the case. Some scales are simply “too far” from the major scale for the original patterns to be of any use. Even changing only one or two notes, in fact, it’s quite difficult to manage. Ultimately you will find yourself learning a new set of patterns for each new scale you want to use. Want to play the neapolitan minor scale? Learn a new set. Want to use the melodic minor for some Jazz? Learn a new set. The CAGED system does not look like an elegant and economic system in this respect.

But Hendrix used it?

Even if Hendrix used it, a scale system is good for you if it helps learning the fretboard in an efficient way, and then does not limit you. It does not matter who used it or not. But since I’ve heard this Hendrix thing countless times, let’s get rid of it once and for all.

The CAGED system was invented and popularized in the late 70′s, while Hendrix died in 1970, so it’s unlikely that he used it. He could have figured it out by himself, of course, but he left no indications of the scale system he used, and from his solos you can see clearly that he’s not using the standard CAGED patterns.

Of course, other famous players may be using CAGED. Many for instance claim that Joe Pass was using it. He certainly mentioned it. O the other hand, I do own Joe Pass’ scales book, and the system he explains in it actually used 6 different patterns, not 5 as CAGED. Also, Joe Pass was using this system more to visualize different chords, not full scales. Based on this, it seems to me that what Joe called CAGED in his days and what is passed as CAGED today are actually two different systems and we should not use the same name for them.

Of course someone is going to mention in the comments that famous schools like Berklee use the CAGED system in their curriculum. Well, this is true, but are their most successful graduates using it? Take for instance the solos of John Petrucci, arguably one of the most famous Berklee students, and you will notice that any non-pentatonic scale in his solos is actually played with a 3-notes-per-strings pattern. Curious, eh?

It’s taught the wrong way

Of course, the CAGED system DOES have one advantage. If you already know how to play pentatonic scales, then you can start playing modal scales by adding modal notes to them. For instance, if you are playing the Am pentatonic, and add the notes B and F# then you are effectively playing the Dorian scale. In this case, starting form the 5 standard pentatonic patterns and adding the modal notes you will obtain the CAGED patterns.

In other words, the cAGED patterns are a nice way to go between pentatonic scales and diatonic/modal scales… and that’s about it.

The curious thing is that I have never seen the CAGED system taught this way. All the educational resources that I have about CAGED insist a lot about the fact that the scale patterns are superimposed on the major chord shapes, but do not even mention the pentatonic/modal connection. It is quite interesting that the CAGED system is branded as a “general” system that can handle any playing situation well (which is not true) and it is not explained in the area where it would shine.

Everybody has a different idea of what CAGED is!

Every time I talk about, write about, or otherwise explain why the CAGED system does not live up to the hype, one or two people are bound to say: “Wait a moment this is not the CAGED system. The CAGED system is…”.You see, this is another problem with CAGED. It has been “copied” over and over by so many less-than-competent authors that everyone now is teaching a different thing and calls it CAGED.

If you are willing to throw enough energy, time , and resources at it, eventually you WILL find a system you like (for a while at least) that is taught under the name of CAGED. This is simply because every way to see the fretboard has been taught before or later under the CAGED name. I have a DVD where the author explains the octave pattern on the fretboard and calls it “the CAGED system”. I have a book that states that the standard tuning of the guitar (established in the 16th century) is a consequence of the CAGED system (invented in the 70′s). And let’s not talk about that YouTube video that explains the 3-notes-per-strings patterns and calls them “a variation of the CAGED system”!

If you realize the absurdity of this situation, you will also see why so few people dare to criticize the CAGED system: no matter what to say, you are bound to find someone that will comment “but this is not the CAGED system” followed by endless and fruitless discussions on matters of definitions. But let me tell you something. I own (and have studied) enough instructionals and DVD’s on the CAGED system alone to fill a 4-feet shelf in my studio. I believe I have more than half an idea of what I am talking about :-)

With this many problems, how can it be so common?

So why the CAGED system seem to be so widespread? We can see his problems, so why guitar educators have not rejected it? For 3 reasons: 1) There is an industry behind it. Pretty much anyone can write (and sell) an eBook on the CAGED system by copying the 5 pattern and telling you to learn them. 2) It’s easy to teach. After all, you are just handed down the 5 pattern and supposed to make sense of them. I have seen the consequence of this method in many students who come to me form other teachers: they know these patterns by heart, but they can’t apply them to save their life. 3)Because it is seductively simple for the people who want a “magic bullet” to learn scales. Again, the slogan “learn the 5 shapes and you are done” proves to be attractive. Don’t fall for the hype, and just throw away these books on CAGED. You’ll be better off in the long run.

About the Author

A professional guitarist, teacher, and composer, Tommaso Zillio enjoys particularly writing about music theory and its application to guitar playing

6 Misconceptions Guitarists Have About Music Theory

 Tommaso Zillio


Do you think you can learn music theory by yourself? Do you think that learning theory will damp your creativity? Do you think that you can find all the information you need on the net? Well, I used to think the same, but I was wrong. If you want to see why, keep reading.

When I was just a beginner at guitar I was sure I could learn everything I needed by myself. After all, there is a wealth of information online, and I owned many books and DVDs, and my friends could help me, and… and each of these sources contradicts the others! In my naivete I thought I could separate the good from the bad. After years of effort, I had to conclude that no, I could not really do it without help of someone who was really knowledgeable in the matter.

I am here to share some of the things I learned in the process.

The first thing to keep in mind is that music theory is not “hard”. It is definitely “complex” i.e. made of many little concepts that work all together, but each and every one of these concepts is simple to understand. This means that if you are introduced to them in the right order, then music theory as a whole is easy to understand. If, on the other hand, you try to learn these concepts in the wrong order, then it is going to be really hard to understand. The problem, as we will see below, is that not all the approaches to music theory that are today popularized through the net follow a meaningful order, in fact most of them are simply plain confusing.

Let’s have now a look at the major roadblocks that can stop or delay your progress in music theory, and what to do about them. This list is of course not complete, but it is a good starting point:

I Can Learn By Myself

Sure. You can also potentially learn how to drive a car by yourself just by trial and error. I do see some downsides to the idea, though. Especially the fact that it is difficult to learn from an error and survive at the same time. Of course, i am over dramatizing here. After all, you can not harm yourself or others if you try to learn music theory by yourself. Or could you?

There are some musicians out there who can compose songs alright even if they do not know any music theory. I can’t help but think that it is a real pity. What could they do if they actually did study music theory? How much more could they do? What songs they could have written but we will never hear? These musicians had to start from scratch and reinvent the wheel by themselves… what could such amount of raw talent do if it was properly cultivated?

The person in history that had the greatest amount of natural talent in music is probably Mozart. And still, he had to dedicate ten years of his life to study composition in order to write what he did. My advice is that, unless you think you are more talented than Mozart, you should not try to learn theory alone.

I Don’t Need Theory: I Can Play By Ear

I wish I had a dollar for every person I heard saying that so I could retire on a private island and not work for the rest of my life. And while sipping my Mohito, I would reflect on the fact that this “play by ear” excuse is just that: an excuse. In fact most of the people that use it have never done any ear training worth mentioning: they can’t transcribe the songs they like, they can’t play the musical ideas that pop in their minds. Ultimately for them “playing by ear” means adopting the “Hail Mary” strategy: playing something random while hoping that something good will come out of it. Most of the time, it doesn’t.

We musicians need to know theory as writers need to know grammar. It is not the ONLY thing we need to know (far from it), but it is absolutely necessary. While it is a common occurrence for many famous musicians (or their fans) to boast that they do not know any theory, once you go and actually check the facts you will find that this is never the truth (the first one to post in the comments that “Hendrix never studied theory” will get a pat on their head and a lollipop before being sent back to music pre-school).

So, now that we have established that there ain’t such a thing as a free lunch and we need to actually put some effort in if we want to be great or at least good, let’s see what not to do.

I Don’t Need To Train My Ear

Since someone is bound to misunderstand the previous point: what I wrote before should not be construed to mean that ear training is useless. Obvious, no?

There is no way to learn music theory without training your ear at the same time. This is because all music theory is essentially made by statements such as: “if you do X, it sounds this way”. For instance: “If you play the interval of a third is sounds this way”, or “If you play a diminished fifth is sounds this way”. The problem, as you can see immediately, is that if you do not know what “this way” means sonically, then you are not learning anything!

This in fact explains why there are so many people that complain that music theory is useless: they learned only the “formal” part of music theory, and never connected it properly with the actual sound.

The solution for this problem is rather simple: just PLAY every concept you learn, and be sure to have 3-4 examples for each of them. If you cannot find a good example, then compose it!

Creativity And Theory Do Not Go Well Together

This is another harmful notion that you can find repeated everywhere. Following the proponents of the “theory harms creativity” camp, one is led to believe that no good music has ever came from musicians who know any theory. You know, people like Bach, Beethoven, Schubert, Chopin, Tchaikovskij, Coltrane, Parker, Django Reinhardt, Hendrix, Satriani, Vai, Jason Becker — all musicians with a VERY solid background in music theory (again, despite what you may have been told about Hendrix).

It is a fact that if you study music theory in the correct way, then your creativity is not harmed but enhanced. What is the wrong way to learn? The wrong way is to think of theory as a fixed set of “rules” that you have to follow. The correct way is to think of music theory as the sum of the experiences of other composers that have handed down to us a set of procedures that worked for them to go from a raw musical idea to a complete piece. These procedures will help you, not limit you, and you can always decide to not follow them if they don’t apply to what you are writing at the moment.

Clearly even if you do not know any music theory you may still have some original musical ideas. But it’s going to be tough for you to actually compose a complete song based on it.

The Information is All Available On The Net

The net is a great resource, and there is definitely a lot available just one click away. And yet all this information can work against you rather than helping you. How? Well, in order to be useful to you, the information you come across needs to be relevant to what you want to do. You see, you will need to study different things if you want to compose music for film than what you should stud if you want to improvise on a Blues. It’s not that one is “better” or “more difficult”: they are just different and require a different skillset.

For this reason — and I realize I’m not the first to say that — you need to know what your goals are and have a plan in place in order to reach them. Without a plan you are simply going to end wherever chance will take you, and in most cases this is not what you wanted at all!

In order to help you find what your goals are and how to arrive there, I have written for you a “map” of music theory that you can download and will show you where you are and what you need to study next. You can find a link to it at the end of this article.

I Can Get Help From My Friend Joe

Ok, but who was helping your friend Joe? His friend Moe. And who was helping Moe? It was Jack. And who… you got the idea. After that many passages, it is very likely that the information that your friend Joe is giving you is not the original info anymore. There is a good chance it is in fact wrong. Now, if this happened only to your friends this would not be a great problem. What makes it more …problematic is that many authors of articles, or instructional books, or DVDs, both online and offline are doing the same: copying each other and propagating information they only half understand.

You would be surprised at how many factual errors I found in instructional products I PAID to have. And don’t get me started to the free stuff available out there — that is even worse. How can you protect yourself from being sold the wrong information? Simple. Ask yourself this question: “the author of this article/book/DVD is able to do the things I want to do?” If the answer is “no”, then don’t buy/read it!

In particular, watch out to people who say that they are “teachers but not performers/composers/writers”. If they are not practicing musicians, then they have no first-hand knowledge of the matter. They are just repeating what they have heard.

Note: the wrong way to decide if someone is competent is to ask him if he has a music degree. While nice to have, there are also a lot of great teachers out there who have no “official” degree but are really competent in what they do. Again, check what they do, not what pieces of paper they have on the wall.

—————

What Should I Do?

Stop immediately reading random books and watching DVDs. Instead follow these three steps: 1) think about what are your goals on the instrument. 2) decide on a plan that will take you from where you are now to where you want to be. If you need some help with that, I have prepared for you a music theory map that will help you orient yourself and decide what will be your next step. 3) Use this plan to decide what you need to read and what not, or (even better) take your plan to a competent teacher that can help you implement it faster. Life is too short to waste time!

About the Author

A professional guitarist, teacher, and composer, Tommaso Zillio enjoys particularly writing about music theory and its application to guitar playing

Is Reading Music a Necessary Skill?

Tommaso Zillio – musictheoryforguitar.com

25/01/2014

Reading music: a necessity for some, a superfluous ability for someone else. Depending on who you ask, you will hear that it is absolutely fundamental that you know how to read (if the guy you asked to actually knows how to read music) or that you should better concentrate on other things (especially if you got your answers from someone who can not read music). It is a fact that most musicians that can’t read feel somehow guilty about it. Is that feeling justified?  Is it really necessary for everybody to learn how to read music? 

Well, you’re not alone in feeling this way: I was feeling the same for a long time (until I actually learned to read music). Was it as useful as I thought it would be?  Yes and no. Granted, I was able to read some more advanced books on music theory But let’s get clear of one of the major misunderstanding right away: you DO NOT need to be able to read music in order to understand music theory. As unpopular as this may be (to some teachers), you can become quite proficient in your knowledge and application of music theory without knowing how to read a single note. In fact, I know plenty of recording studio professionals who do not read standard music notation (but see below). And these were the good news.

There’s More To It Than Standard Notation

The “bad” news (but they are not really that bad) is that you DO need to learn some form of music notation in order to communicate with your fellow musicians, or to write down your ideas. In fact, you already know at least one (writing down chords on top of the lyrics of a son). So don’t worry!  Not all types of music notation require you to learn to read a score. Most of them are way easier, and just as useful (if not more, at least in some communities of musicians).

You might ask, why do you need to learn one of these types of music notation?  Well, for instance if you don’t know ANY ways of reading/writing music you will be quite a disadvantage in any situation where you need to work on a song, both by yourself and with other people. Communicating efficiently will be impossible. You may also be excluded from some circles because it is too difficult to explain songs or concepts to you.

So the key here is to learn the music notation you NEED to know. The first step is: determine what music notation you need (we’ll get to it in a moment). The second step is (brace for it) learn it. There are some resources at the end of this article to help you getting to that. In the following we are going to look at Chord-based systems, Tablature, and Standard notation. All these systems are useful if applied in the right context.

Tab vs Standard Notation

For starters, let’s acknowledge the elephant in the room. If you are, or if you want to be a classical musician, you absolutely need learn to read standard music notation. The same is true if you want to work in situations where you need to work with classical musicians (such as becoming an orchestrator, or working in the movie music industry). These goals are very specific, and I will assume that you do not share them in the rest of this article. Of course, if you DO have one of these goals, then you simply have to learn the standard notation.

Standard notation is not a monolithic block, though. While I do not recommend everybody to learn the whole thing, I do heartily suggest that anyone who want to be a musician should learn rhythmic notation (i.e. what is a bar, how to divide it in beats, how to divide the beats in eighths, sixteenths, triplets, etc). Rhythmic notation needs is easy to learn and had an incredible power to generate musical ideas: you do not want to miss on that.

A widespread notation used for guitar (as you know for sure) is Tablature (from now on Tab). Tab has both advantages and disadvantages. The main advantage of Tab, and doubtlessly the reason why it is so popular, it’s that the fingering is already done – with other forms of notations you need to figure out where to play the notes (the same note can be played on more than one position on the guitar). On the other hand, since different players find different fingerings more comfortable to play, this very feature is also one of the main disadvantages of Tab. Another disadvantage of Tab is that it is impossible to learn a song only from Tab due to the lack of rhythmic notation. while it is definitely possible to learn a piece of music from standard notation even if you have never heard it before.

While Tab got a bad reputation as music notation, I think this is because it has been used the wrong way. I am of the opinion that Tab is a great and intuitive way to write music, provided you use it in the right way: you have to compensate the lack of rhythmic notation by having a recording of the song you are trying to learn and listening to it frequently while learning the piece.

Chord-Based Systems

While being the most known systems, Tablature and standard notation are definitely not the only ones used. There are in fact other even more common music notation systems. These systems are generally used to notate chord progression as opposed to a complete arrangement (such as Standard notation or Tablature). The most used one is probably the Nashville “number system”: this system is simply a must to know for most studio work and jam sessions. It allows you to rapidly communicate chord progressions in any key and as a side bonus it also improves your knowledge of music theory!  I definitely recommend that you learn this system – it’s easy and useful.

If you are a classical musician, you might want to learn the classical “roman numerals” music notation method instead. The two systems — the Nashville and the Roman Numerals — are practically equivalent: they are both used to notate chord progressions. The only real difference between them is that he roman numeral system is more common in classical music, while the Nashville system is more widespread in modern music.

How Can I Learn The Right System For Me?

The main point I want to make with this article is that you should learn to read music only if this is congruent with your goals as a musician. As an example, if all you want to do is to play 12-bar blues, you are better off practicing your improvisational skills rather than learning standard notation. Also, if you discover you need to learn how to read music, you have to learn the right system for your situation. What you need at this point is a step-by step explanation about how to learn these notations by yourself.

As far as I know, there is no such comprehensive resource online, so I took the time to write a free eBook for you with an explanation of all the systems of music notation we have seen before. Click on this link to download your <a href=”http://www.musictheoryforguitar.com/musicnotationsebook.html”>free eBook on reading music</a>.

About the Author

Tommaso Zillio is a professional teacher, guitarist, and composer, and is your go-to guy for any and all <a href=”http://www.musictheoryforguitar.com”>music theory</a>-related questions.

Tritone Substitution for Fun and Profit

 Tommaso Zillio


Jazz music is your kind of music but it seems so complicated? Tired of deciphering odd-looking chord symbols and how they relate to the fretboard? Too many chord patterns to learn?

The secret to understand these matter is to become familiar with Jazz substitutions. The idea here is to start from a simple chord progression and make it more complicate (and interesting) by the application of a few rules that at fist sight look really complicate themselves. These rules “substitute” a chord with another, hence the name. Once you can create chord progressions this way it’s also easier to remember and play existing chord progressions, since you understand them at a deeper level.

The problem is of course to understand these odd-looking substitution rules. Most resources (articles, book, teachers…) are not really helpful here, especially when they start their explanations with phrases like “clearly, C9/b5 without a root is the same as Gb7/#5″. Clearly? Listen mister, what I wanted was to play some music, not learn math formulas. (BTW, I did not made that up, it’s a true quote from a book that I will not name).

Good news everyone: it does not need to be that way. All these Jazz players who discovered these substitution “rules” did not have to get a PhD in math in order to understand them. Which makes you think that the problem is not the rules per se, but the way that they are explained. And in fact, substitution rules are quite natural if you sit down a moment and try to understand WHY they work.

In the video below I will show you how to use one of these “scary” substitutions to make a standard Blues progression sound like a complicated Jazz. Best of all? It’s easy, so easy that once you see what I’m doing you can IMPROVISE the chord shapes rather than using chord shapes that you committed by hart.

Watch this video and you’ll see what I mean.

http://www.youtube.com/watch?v=Vwo5yleFesM

What should be your next step? Well, the first thing to do is definitely to pick up your guitar and play all this! This few shapes will be under your fingers in no time.

The beauty of this approach is that you can apply the substitution straight on the fretboard. This is how great Jazz guitar players do it: they don’t “calculate” the chords and then find them on the fretboard: they know how a substitution look on the fretboard so that they can apply it immediately.

About the Author

A professional guitarist, teacher, and composer, Tommaso Zillio enjoys particularly writing about music theory and its application to guitar playing

How To Clean Up Your Blues Guitar Licks

By Tom Hess

Do your blues guitar licks lack musical expression because you are unable to simultaneously play them with both power and accuracy? Fact is, most guitarists have a hard time playing inspiring blues licks because they are unable to keep unused strings from ringing out (causing their licks to sound muddy and unclean). Before you can play highly self-expressive licks, you must solve this problem using proper muting technique.

For most guitarists, unwanted string noise frequently occurs while playing blues licks and using wide vibrato, double stops or extra power in the picking hand. You must master the ability to play cleanly while using these techniques, otherwise your blues guitar playing will never sound as self-expressive as you want it to.

For the rest of this article you will be taken through the exact steps needed for cleaning up unwanted string noise in your blues guitar licks. Before you read the steps in this article, check out this free video on the topic of how to play blues guitar licks so you can easily integrate the concepts of this article into your guitar playing:


After you’ve finished the video above, grab your guitar and complete these steps to make your blues guitar licks sound truly mean (without sacrificing cleanliness or accuracy).

Step One: Quickly create a new blues guitar lick containing a maximum of 2-3 notes. To give you some ideas to get started with, look at the examples below:

Blues Lick 1 Blues Lick 2 Blues Lick 3

It is very critical that you only create guitar licks with no more than three notes maximum. By using a limited number of notes, you will have no choice but to think creatively about achieving maximum expression in every note you play. This will help you become more musically expressive (increasing the quality of your licks). This is also important because it will help you focus on using proper muting technique to keep your phrases clean. Also observe how I did not notate the rhythm in the examples I provided for you. You are free to think creatively about the rhythms you use while playing these examples. Additionally, don’t play all of these licks at once, choose ONE and practice it many times until it becomes second nature. As you play through your lick, make sure the last note you play ends with an ‘upstroke’. You will see the importance of this in the next step.

Step Two: Pay close attention while using an upstroke to play the last note of your blues lick to make sure it comes to rest on the adjacent lower string. This uses the ‘rest stroke’ technique demonstrated in the video above. It is a common mistake to let the pick to come away from the strings while doing this, so make sure this is not occurring for you. To avoid this, rest your hand on the strings using either palm muting or thumb muting in your picking hand (I highly recommend you use thumb muting in the same way it is used in the video demonstration). Take several minutes to practice this.

Step Three: Now, use the available fingers of your fretting hand and picking hand to mute the strings that could be vibrating as you are playing the lick. If you are not sure how you should be doing this, check out this article about how to get rid of sloppy guitar string noise to see photos of how this is done correctly. Again, work on this for a few minutes before moving on to the next step.

Step Four: Add as much intensity to your lick as possible by performing any combination of the following sub-steps:

  • Use very heavy vibrato to emphasize any sustained notes in your lick.
  • While playing double stops, use heavy vibrato on both strings simultaneously.
  • Use as much power as you can in your picking hand by using A LOT of force to strike the strings.

While using a lot of power to pick the notes, you will see the importance of muting with the techniques you learned in the previous steps. If you are still having issues with unwanted string noise, return to the previous steps to fix the problem. Don’t worry if you cannot play your licks perfectly without any string noise yet. Be patient, practice and you will quickly be able to incorporate your lick into your everyday guitar playing and make it sound great.

Step Five: Once you have mastered playing your lick with both power and accuracy (no excess string noise), think of 3-5 additional phrases and follow the previous steps to make many more killer blues licks.

Discover new ways to create more licks by checking out this free classic rock guitar licks video.

Find out how you can use speed to raise the intensity of your licks by watching this free guitar speed building video.


About The Author:

Tom Hess is a professional touring musician, composer and successful rock/metal guitar teacher. He helps guitarists around the world learn to play guitar online. On his website tomhess.net, you can find guitar playing tips, free guitar resources and more guitar articles.

Check out further free blues lessons on http://www.internet-guitar-lessons.com/blues-guitar.html