Are you still unable to tremolo pick with super fast speed? Most likely, you are making the same mistake as the majority of other guitarists… you associate quick hand speed with fast picking. These two things don’t necessarily go hand in hand, and I’ll tell you why…
Truth is, the majority of guitar players already have enough speed in their fingers to play at very high levels. The thing that prevents them (and you) from doing so is the length that the pick travels for each note being played on guitar. Most guitar players are oblivious to this and think their lack of speed has to do with not moving their hands quickly enough.
To develop insane tremolo picking speed, you must increase the frequency at which your pick comes into contact with the string (don’t confuse this with simply moving your hand faster). When you do this, you strike the string many more times and your tremolo picking speed shoots through the ceiling!
Before you continue reading the rest of this article, watch the following video to see exactly how this is done:
Like you saw in the video above, you will immediately play with two times the tremolo picking speed by merely splitting your pick attack distance in half. Now that you are familiar with this idea, begin picking faster using the exercise below:
The first rule of building your tremolo picking speed: ALWAYS watch your picking hand during your picking technique practice! If you spend all your time staring at your fretting hand or don’t watch your hands at all while practicing, you will never develop incredible picking speed.
To begin developing faster picking speed, select an open string to use tremolo picking on and go through the following steps:
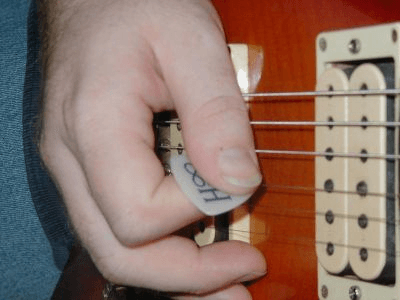
Step One: Continually pick using sixteenth notes at a slower bpm for around 15 seconds. Angle your pick at about a 40 degree angle while facing it towards the headstock of the guitar. This will keep you from losing dynamics or picking lightly while reducing picking movements. Like this:
Note: You will also generate greater power in your picking attack while using less effort by playing with a thicker pick (1.50 mm or more) instead of a thin one.
Step Two: Next, play at about a 10% faster rate while continuing to pick for an additional 5-10 seconds. Remember to keep watching your picking hand and maintain compact picking motions. This will make sure that no unneeded movement is being used that would keep you from increasing speed.
Step Three: Gradually raise the tempo you are picking at while still paying careful attention to your picking hand motions to reduce the distance between up/down strokes as much as you can. Additionally, pay attention to the following:
-Don’t ignore power and articulation whenever you are cutting down the distance in your pick attack. Keep a good amount of articulation in your attack by putting more of the pick in the string. This way you will be able to produce small picking motions while still maintaining a booming, powerful attack (instead of picking with the very tip of the pick like so many guitarists do – reducing their articulation).
-Your forearm and picking hand shoulder MUST be very relaxed whenever you are picking fast. It will not help you to tense up these muscles… it will only make you tired while increasing the chances of injury. Try to keep these muscles completely relaxed as you notice your speed increasing.
Keep raising your speed until you are tremolo picking at the maximum speed possible. Continue playing at this speed for an additional ten seconds or so.
Step Four: Now take a short break from playing for a minute before repeating the first three steps three more times. To improve your tremolo picking technique even more, switch between playing open strings and playing fretted notes (this will produce different levels of tension in the strings and challenge you to get better). Utilize this exercise with an effective guitar practicing schedule and you will quickly begin seeing killer results in your speed picking technique.
IMPORTANT: This concept of shortening the distance in your picking attack can be used in other areas besides just tremolo picking! As demonstrated in the video above, you should also implement this idea into your playing while using multiple string guitar licks and scales. This will embed your tremolo picking skills into other aspects of your lead guitar soloing technique and build your overall speed.
Using the lick below together with the exercise above. While doing this, focus on your picking hand so that you keep your pick attack as tight as possible (while playing with plenty of power and loudness).
Now that you understand how to develop a lot of tremolo picking speed on guitar, realize that this is merely one aspect of becoming a much faster guitar player. To find out more about the other elements that go into increasing overall guitar speed, check out this mini course on how to play guitar fast.
To understand much more about how to not only develop insane guitar speed but also become a creative musician, take guitar lessons online.
What is the one thing that your favorite guitarists have in common when you see them playing fast? The answer is that all of them play in a manner that looks astonishingly easy. In fact, speed guitar playingnot only looks effortless – it IS effortless…or, more specifically, it BECOMES easy after you experience the process of training this skill correctly.
Sadly, nearly all guitar players can’t make their speed playing feel easy, and any effort to play guitar fast is a challenge. Reasons why this happens are plenty, but one of the most typical is pursuing the traditional practice mindset of beginning to practice slowly and building up speed little by little. Despite the fact that this approach DOES have a few of advantages, it also has many serious restrictions (when applied at the wrong time or mistakenly… as happens quite often).
The following factors are why the typical guitar speed developing strategy (practicing from slow to fast by increasing speed little by little) makes fast playing feel complicated:
It’s easy to become lazy and make entirely different movements at slow speeds in comparison to what you do when playing fast. Consequently, as soon as your speed improves past a particular point, your playing will become uncomfortable and hard, because now you will be using movements that you did not use in the past. I’ve already discussed this to a great extent in this article about how to practice to boost your guitar speed.
Releasing the excessive tension that usually builds up through faster playing is something that the traditional approach doesn’t allow you to practice. Therefore, as your speed grows, your guitar playing begins to become more and more like a challenge and you get fatigued fast.
You don’t practice for actual speed in your guitar playing (where you have to start playing without playing anything before). It’s much easier to play an exercise over and over, incrementally arriving at your peak speed and having the playing of that one exercise be great. However, when you must play the exact same exercise at your top speed IMMEDIATELY, with everything feeling effortless and sounding clean, the feeling is much different. Thus, traditional guitar speed building mindset doesn’t prepare you for playing in real life.
Ordinary guitar speed development methods force you to increase your speed with the full exercise all at once. In many instances this can cause mindless guitar practice(hoping to get faster by merely doing an exercise time and time again).
Note: the typical strategy of “start practicing slowly and speed up little by little” IS effective when you are practicing a new thing (and it’s also very useful for beginner – intermediate guitar players). However, the better of a guitar player you become (and the faster you wish to increase your speed in a specific exercise) the more you will need highly specific practice methods for overcoming your speed plateaus.
You now understand what the disadvantages are of the ordinary approach to building speed on guitar, so I will show you one of multiple approaches you can use to move beyond guitar speed plateaus and make your playing feel comfortable while playing fast. This strategy is one of many that I use with my electric guitar students to assist them in building higher levels of guitar speed.
Practicing Guitar With Speed Bursts
Rather than playing a whole phrase at a very slow tempo and incrementally increasing speed, split up that phrase into very small bursts (between 4-8 notes each) and practice every one of these at your TOP speed.
Watch this video to get a clear understanding of how to practice this concept:
When you implement speed bursts in your guitar practice, it will help you to develop your guitar speed easier and sooner. Below are the reasons why:
Your guitar speed will in fact come to be useful in real life playing (where you can’t play something time after time and rather must jump in and play something at your peak speed instantly).
You are able to use rests between the speed bursts to release tension from your hands and ensure that you use no more tension than necessary. This is a really effective approach to make your guitar playing feel extremely effortless and comfortable… exactly like your favorite guitar players.
You will teach your mind and your ears to become aware of notes at blistering speeds and hear/fix errors much more easily. This is CRUCIAL, because your playing will sound like a sloppy mess if you try to play guitar fast WITHOUT this skill.
You won’t be able to play guitar with lazy and slow movements – you are actually training them to do exactly what they should do when you are playing fast.
You will be able to instantly isolate portions from a larger exercise and concentrate on particular errors that prevent you from playing the full exercise at the speed you wish.
You have now discovered a noteworthy way of making fast guitar playing feel very effortless. The next action you must take is to learn all the other techniques that will help you to MULTIPLY your guitar speed while reducing your practice time by fifty percent (I will teach you how to do this for free). Discover how it’s done by reading this page about increasing your guitar speed.
Most guitarists can’t play sweep arpeggios as fast or as clean as they would like. They struggle to improve their technique but in reality, they have no idea where to even begin. This is a problem I see all the time and have helped many of my guitar students overcome.
There are 2 ways to go about improving your arpeggio sweep picking. One will keep you frustrated and sloppy while the other will allow to progress your playing to a whole new level and get enjoyment out of the process.
Which Approach Do You Take?
Guitar Practice Approach 1: Most would assume that, since their sweep picking isn’t fast or clean, that they need to practice MORE arpeggio sweep picking licks. This approach’s biggest problem is that you are ignoring the problems that stem from your bad technique. By avoiding the root of your guitar technique problems, you are only distracting yourself from real improvement. So with this approach you will end up knowing a lot of different licks, but they will all be executed sloppily and with poor technique.
Guitar Practice Approach 2: If you want to make your sweep picking arpeggios cleaner and faster, then you need to take the arpeggio you are working on now and make it its OWN exercise. By doing this you will be able to expose where your exact problems lie (down to the note) and figure out WHY you aren’t playing as fast or clean as you should. This will benefit your guitar playing in 2 ways:
· By correctly identifying and fixing fundamental problems with your guitar technique in this first exercise, you will see vast improvements in your technique (speed and clarity) in ALL of the arpeggios you practice in the future.
· By modifying these standard arpeggio shapes your new exercises will often be VERY unique and cool. You will see your solos improve as you incorporate your new sweep picking arpeggios into them.
To see an example of this second guitar practice approach in action, watch this video about making your arpeggio playing faster and cleaner while turning your exercises into killer sweep picking licks:
How To Apply This Idea Into Your Guitar Practicing To Make Your Guitar Playing Better:
The biggest lesson here is NOT the arpeggio exercises themselves. It’s NOT even playing your arpeggio notes with tremolo (as the video demonstrated). The biggest thing you should take away from this is that you have to use the correct mindset when you approach solving ANY kind of problem areas in you guitar technique.
1. The problems and mistakes in your guitar playing always have a cause. They are never just random. These causes can be identified (and must). If you settle for sloppy guitar playing technique you are hurting yourself immensely.
2. Searching for more guitar exercises will not be the answer to all of your technique problems. Instead, you should understand exactly where your weaknesses lie in your current exercise. This will help you to see which parts of your technique need to be improved thus helping EVERYTHING you play be faster and cleaner.
3. You can modify even the most boring exercises in a creative way. Now you will be able to improve your guitar technique while creating awesome licks in the process.
The video demonstrated an exercise that is just ONE (of many) examples of how to clean up your guitar technique while increasing your overall speed and accuracy. To keep your practice time to a minimum while vastly improving your guitar technique, check out this article on increasing guitar speed.
About The Author: Tom Hess is a highly successful recording artist and guitar teacher. He teaches guitar lessons online to guitarists internationally. Visit his website tomhess.net for more information about learning guit
Have you ever been practicing something on guitar for many months without making a breakthrough? Regardless of how much work you put in, you just can’t make improvements… So you end up becoming disappointed, wondering if you’ll ever be able to play guitar like you want.
Before I help you solve this problem for good, you have to understand that you CAN become an incredible guitar player, just like your favorite guitarists. If you aren’t achieving your guitar playing goals, it doesn’t mean you have no potential, or that you lack natural musical ability. It just means one or both of these two things:
1. You never understood the right steps to take while practicing to play anything you want on guitar (more on this below).
2. No one ever correctly taught you HOW to practice the aforementioned steps. This part is a lot trickier (and self-taught guitarists in particular struggle with this) because it requires a detailed awareness of how to effectively practice guitar. It’s simple to understand WHAT to practice (since these things are often rooted in common sense), but implementing them correctly is not so simple.
Think of your guitar playing as a struggle between two forces: one side being the practice you do to make your guitar playing feel easier, and the other side being the problems that consume your playing (making it harder than it should be). Whenever one side overcomes the other, your goal is split between the following:
To keep making your practicing highly effective, so you can make faster progress (I’ve explained many ways of doing this in my other guitar playing columns).
To move beyond certain challenges that keep you from playing the things you want to play as well as you’d like to play them (this is what I’ll show you below).
To help you completely understand the practicing process explained below, watch this video that demonstrates how this approach makes your guitar playing better. Do this now before you read the rest of this article.
Note: although the video above shows how to practice guitar correctly using only a single context, the generalprocess for solving problems applies in the same way to EVERY technique and guitar style (from shred guitar sweep picking to blues double stop licks, to fingerstyle acoustic licks).
Start playing whatever you want on guitar by following these steps:
Step One: Act As A Doctor While Practicing Guitar
The crucial mental error many guitar players commit while practicing is looking for a way to fix symptoms (what they think are the problems) in their playing, rather than trying to solve the real root causes (actual problems). This is even more common among self-taught guitarists, who were never shown effective ways to practice guitar. As you saw in the video demonstration above, it’s very simple to incorrectly diagnose a problem and falsely assume that you know its cause, only to throw away tons of time practicing the wrong things – making almost no progress at all.
The best way to stop wasting time on mere symptoms of problems and to really improve your guitar skills, is to get feedback from an expert electric guitar instructor who can analyze your technique and pinpoint the exact things that are keeping you back. In addition to giving you the immediate fix to your guitar challenges and frustrations, working with a teacher will help you become your own guitar teacher and solve guitar playing problems by yourself. This is easily the greatest benefit of guitar lessons, and is the reason why guitar players who learn with a great teacher quickly become killer players.
This is not unlike going to a doctor with some symptoms of not feeling well or having certain aches in your body. Rather than prescribing medicine for the top level symptom of any issue you have, a great doctor tracks every symptom down to its root causes and treats it, causing you to feel much better (getting rid of all the symptoms at the same time). Of course, doctors aren’t born with knowledge of how to solve health problems – this knowledge is gained and learned. The same can be describe your guitar playing: even if you struggle with correctly identifying the causes of your biggest guitar playing problemsright now, you definitely CAN overcome them and (over time) become your own guitar playing doctor.
Step Two: Transform Any Problem Into A Self-Sufficient Guitar Playing Exercise
Once you’ve identified the problem that is preventing you from playing what you want on guitar, your next move is to find out how to correctly isolate and fix it. As you observed in the video above, spotting the specific issue (the hammer on and pull off in that particular example) was NOT enough on its own. The next step is to place the problem into the original context to transform it into a self-sufficientexercise. “Self-sufficient” meaning: you do not have to look for great guitar playing exercises to fix it – the problem itself BECOMES the exercise you must work on.
Step Three: Don’t Stop Drilling…Until You Strike Gold!
Once you identified the exact problem that must be solved to move your guitar playing forward and you correctly transformed it into its own exercise, you now have to practice the problem until it’s solved.
The mistake that most guitarists make in this step of the process is not completing enough quality repetitions of the exercise to develop guitar playing habits to take the place of the old ones.
Version One: Some guitar players stop working on the exercise prematurely – they get bored, lose their focus and quit after practicing for only a few minutes… never to come back to the exercise again. So they simply never complete sufficient repetitions of the exercise to improve their guitar playing.
Version Two: Others will move forward through strong discipline and willpower to end up practicing the exercise for many hours at a time. Although they perform many repetitions of the exercise, the qualityof each repetition begins to decline as they play the exercise over and over, eventually losing focus. Read this column about practicing guitar in a mindless manner to learn more about this.
The right way to create a good habit is by continually practicing guitar in bursts of concentrated effort for several minutes at a time. Instead of practicing the same exact exercise for many hours on end, practice it for several minutes at a time, many times throughout the day, gaining tons of volume (repetitions) over the course of a week.
Version one of the mistake above frequently happens with guitar players who never use practice schedules. Their practicing is cluttered and random (and it shows in their playing).
In contrast, version two of the mistake above happens frequently to guitar players who don’t know the nuances of correctly training the body and the mind to play guitar. Instead, they attempt to build their practice schedules with linear guitar practice methods using a spreadsheet or a calculator (huge mistake!).
To steer clear of both mistakes, you must be aware that teaching a human being to play guitar is much different than programming functions into a computer. It’s for this reason that you must utilize aneffective guitar practicing schedule that is made for getting big results.
Now that you know what is required for playing whatever you want on guitar, begin applying the advice provided in this article (and in the additional resources given throughout) to make your practicing more effective and your guitar playing much more easy.
If you still have a hard time attaining the results you desire from your practice time, you will achieve your guitar playing goals faster by working directly with me. Check out this page about guitar lessons onlineand tell me about the greatest guitar playing struggles you currently face.
Want to learn how to improve your picking technique so you can play faster? You don’t need to look up brand new exercises for guitar… you’ll only need to make one simple adjustment. Use this simple concept from now on to improve your picking technique, and enable yourself to effortlessly play faster on guitar:
1. Whenever you ascend while playing strings on guitar (go from a heavier string to a lighter string), ALWAYS use a downstroke – regardless of the notes that came before or after what you are playing.
2. While descending strings (moving from a higher string to another string below), play with an upstroke.
(…you can still use alternate picking while playing several notes on a single string).
This idea is referred to as “directional picking”. I teach this to all my correspondence rock guitar students to help them become faster players. Many guitarists would (falsely) refer to this technique as “economy picking”. However, this term is a name for a separate technique (more on this below). The main thing to understand here is, of the three most known picking techniques (alternate picking, directional picking and economy picking), directional picking is by far the easiest to learn and master in order to develop insane guitar speed.
Here are four main reasons why directional picking is the best way for you to become a faster guitarist:
Reason #1: You use much less movement – this translates into FASTER guitar picking speed
As you play scales with three notes on each string it’s not necessary to skip over strings (as you would need to with alternate picking). Rather than doing this, you simply move directly to the next note by picking in its direction (as described above).
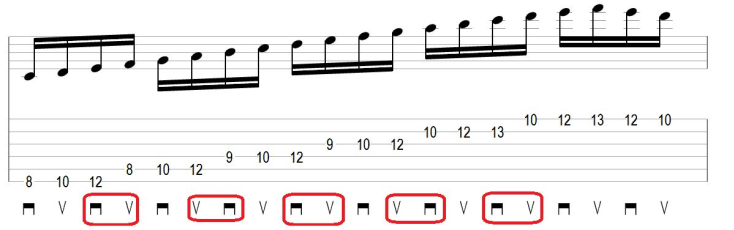
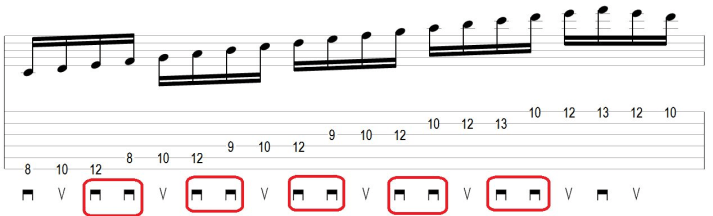
Here is an example of an ascending scale that displays this (the symbol means “downstroke”, while means “upstroke”):
Alternate Picking:
Directional Picking:
In the diagramsabove, the red indicators surround two downstrokes in a row when the scale is changing strings with directional picking versus alternate picking.
Notice: to develop incredible guitar speed using directional picking, you have to properly complete string changes with two consecutive down/up strokes and avoid a frequent mistake guitarists make when they initially use this technique. If you do it incorrectly (like most people when they begin), your guitar picking speed will not achieve its greatest potential. Check out the video below to see a demonstration of this idea to one of my guitar students who is just learning it for the first time:
;
Reason #2: You guitar practice become more efficient so you can build speed faster
After checking out the video above, you observed how directional picking uses similar picking motions used in sweep picking lead guitar technique. In other words, while practicing directional picking, you are also working to improve sweep picking. By practicing sweep picking, your directional picking becomes more clean and articulate.
Certainly, this does not mean you can neglect sweep picking practice altogether just because you are working on it with directional picking – it merely means that practicing each technique in isolation (directional picking and sweep picking) carries over to the other technique. Study the sweep picking video below and observe how the string changing motions from directional picking translate directly into sweep picking:
With this in mind, practicing exclusively with alternate picking will NOT help you master sweep picking (and sweep picking will not help you master alternate picking). So you must invest additional practice time into mastering both guitar techniques separately.
All of the concepts discussed above make directional picking a great technique to work on when you feel like you don’t have time to practice guitar and/or want to play faster as soon as possible.
Reason #3: Directional picking vastly IMPROVES your accents and picking articulation
You may have heard the claim that alternate picking enhances the accents of your downstrokes while directional or economy picking are more quiet and limit you to playing with weak articulation. Fact is, accents and articulation come through better control of your overall technique, NOT by using downstrokes versus upstrokes. This is one reason why the claim above is wrong.
Here is some reasoning to show you why this false claim is TOTALLY misguided and why reality is the opposite:
*You can articulate any note using either an upstroke or a downstroke, whenever you want. To see for yourself, choose any note on guitar and play it with a downstroke… then immediately play that same note using an upstroke (but played with additional force). Chances are, you could easily do this. And if you could, then you already know that you don’t need to use a downstroke to have the note be accented. Accents and articulation are accomplished by having good control over your overall picking technique, NOT by focusing on downstrokes vs. upstrokes.
*The concept of alternate picking (strictly making ALL downstrokes be heavily accented and ALL upstrokes not accented) is very restricting. Since any note can be accented with any type of pick stroke, there is no true advantage to forcing yourself to play in the same manner all the time. On top of that, whenever you need to pick a different way (by articulating an upstroke or having the accent fall anywhere other than the downbeat), your playing will feel very awkward.
However, if you practice using directional picking (where accents can fall on any pick stroke), you won’t run into the problems above. You will learn to articulate notes either on downstrokes or upstrokes and will not be limited to doing so only on the downbeat. So directional picking provides more options for articulating notes in any manner you desire…IF you master control over BOTH downstrokes and upstrokes. After helping tons of students become killer electric guitar players, this has been the case for every one.
The main reason why guitarists who exclusively use alternate picking make the claim above is their upstroke articulation is weaker than their downstroke articulation. Therefore, when they try directional picking, it feels weird to them to use upstrokes for accents, and they have to come face to face with the weaknesses in their guitar picking technique. Instead of taking on their technical weaknesses to improve their technique, many merely choose to move back to their comfort zone and claim that “directional picking limits one’s articulation”.
*When you make string changes with directional picking, by playing two notes going in the same direction, these notes are more accented, due to the momentum and follow-through of the picking motion (watch the video above to see this).
Think about this motion in terms of boxing. Boxers are told to throw punches that go THROUGH their opponent in order to get maximum power in their punches. This is the same thing that happens with directional picking when you switch strings by playing two continuous upstrokes or downstrokes. You pick using momentum from a previous note to follow THROUGH the next note. This makes it much more loud and articulate (when you choose to make it this way).
When you only use alternate picking during string changes, you must go around the next string, kill all momentum and then reverse the motion to perform an upstroke. This is a complete waste. Additionally it keeps you from taking advantage of the momentum from the previous note because of the inefficient picking path.
Reason #4: Directionalpicking is a powered-up version of alternate picking
Most people who are against directional picking defend alternate picking, while ignoring the obvious: in most guitar playing scenarios, directional picking and alternate picking are completely the same. Whether you are playing on a single string or using two or four note per string scales, your pick will usually move in PRECISELY the same manner with directional picking or alternate picking.
The only scenario where directional picking separates itself from exclusive alternate picking is during 3 note per string scales, where it is logical to do so for the reasons stated above. As a result, directional picking has ALL the advantages of alternate picking, with none of its disadvantages.
Directional picking is NOT a separate picking technique and doesn’t require learning new picking patterns or relearning the way you play guitar. The only adjustment you must make in your guitar picking technique is what I talked about at the beginning of this article. With a little practice, you can apply this change into your everyday technique and build your guitar picking speed fast.
That said, even with all this information in front of them, many people decide not to take advantage of this technique, because of several false rationalizations…
False Rationalization #1: “I’d like to get good at alternate picking first and then change to directional picking”. This argument makes no sense because it makes no sense to practice a technique that 1. is less efficient and 2. you must unlearn/change later ANYWAY. It makes much more sense to simply begin using directional picking – gaining all the advantages of alternate picking, without any drawbacks.
False Rationalization #2: “Directional picking means you have to figure out picking patterns before you play them.” If you believe this, then you are conflating “directional” picking with “economy” picking. Economy picking is a technique that requires switching strings using a sweep picking motion at all times – thus causing you to plan how many notes per string you must play in every phrase.
Directional picking is not like this – you simply use the 2 rules I gave you at the top of the article. Then, you will alternate picking notes when it is the most efficient path to the next note, OR use sweep picking on string changes when it is the most efficient path to the next note.
False Rationalization #3: “Directional picking makes it harder to perform string skipping/inside picking because the pick has increased chances of hitting the string being skipped.” This argument is not valid in the same way that the argument that directional picking has weaker articulation is invalid.
Directional picking is not to blame for making anything more difficult, it only exposes the weaknesses in your ability to play cleanly in some situations. These situations include continually picking inside a pair of strings and playing specific styles of string skipping that exclusive alternate pickers stay away from. When you understand weaknesses, you have a decision to make – you can master them and gain control to play how you want OR you avoid them and continue the lie about directional picking supposedly making string skipping harder.
Consequently, correspondence rock guitar students who learn directional picking from me, always have an easier time learning string skipping/inside picking than strict alternate pickers.
False Rationalization #4: “My favorite guitarist plays very fast with only alternate picking, and I want to play like him. Therefore, I will continue using only alternate picking”. If you think this way, know that:
*Directional picking is precisely the same as alternate picking in just about every scenario…only made MORE efficient when possible. So it only makes it faster and easier for you to increase your guitar speed.
*There is no doubt that many people play guitar fast while exclusively using alternate picking… however, you also can’t deny the obvious inefficiencies of this technique. So while you definitely CAN learn to pick fast on guitar while exclusively using alternate picking, you will build the same degree of guitar speed much faster, with little effort and frustration if you use directional picking.
False Rationalization #5: “Directional picking is only for rock/metal guitar players, it won’t work for my playing style.” Think again. Just because directional picking makes it simple to develop insane guitar speed, this does NOT mean it is unusable in non-rock/metal styles. Its most critical benefit is that it makes your overall picking more efficient so you can play better in any musical genre.
Now that you understand why directional picking is a crucial technique to add into your guitar playing, I want to teach you HOW to master it so you can reach your guitar playing goals in the quickest, least difficult and most straightforward way possible. Check out this page about effective guitar lessons and get started reaching your musical goals.
The first step to playing intense, emotional guitar solos is being able to play a single note with tons of emotion. The next step is taking that single note and expanding from it, so that every guitar lick you play sounds extremely emotional.
Note: You will be lost in this article if you have not already read the third part of this series on how to play lead guitar solos. Read it now, if you have not done so.
To increase the emotional intensity in every single lick of your solos, you have to become aware of how each note feels as it is played above a specific chord/chord progression. Every note you use in your solos has a different function while it is played over different chords, so you can change the way a lick feels emotionally by combining different notes together. Here is an illustration of what I mean: if you are using notes A, B and D over a G major chord, each one of these notes functions differently (A as the second, B as the third and D as the fifth). If you were to use a G note in the place of the D note, it would function differently (as the root) and completely change the overall emotional feeling of the lick.
Visualize painting a picture using different colors. As you use one note over a chord, you only experience a certain emotion (this is the function of that note). Then as you combine this note together with several others, it’s like blending many colors together to create a new one. Just by altering one or two notes in a lick, you can cause a massive change in the way the lick feels.
To hear precisely what this sounds like, watch the video below:
To begin implementing this idea into the licks of your guitar solos, play the .mp3 samples below and use the instructions I made for you. Keep in mind that each sample has been recorded for an entire minute in order to make it easier to complete the steps below:
Step 1– Listen to the .mp3 file above for lick number one and play these chord progression to it:
E minor – A minor – C major – G major -
(Play each chord 5+ times so you can get a good understanding of how each note in the lick feels over it.)
Step 2– Identify how each note in the lick above functions when combined with the chords you just played. Doing this is important for recalling WHY any lick you play feels how it does – giving you the ability to recreate that same feeling in any musical context. This skill is one of the most useful skills to have as a musician… keeping you from becoming the kind of guitarist who wastes time trying to think of a lick that will sound cool over a chord (rather than KNOWING what will sound cool ahead of time).
If you don’t know enough about music theory to understand the above step, study the ideas in this music theory video.
Step3– Complete the first two steps again by playing the chord progression from step one over the remaining licks.
Step4– Go back and repeat the first two steps again. Instead of using the chord progression from step one, play these chord progressions over the licks they specify from above:
Play over guitar lick two: C major – E minor – C major – G minor
Play over guitar lick three: F major – G major – A major – E major
Play over guitar lick four: E minor – C major – G major – F major
Once you have finished the steps above, it will be much easier for you to understand how each note you play changes the overall feeling of your guitar licks. It’s crucial that you continue to pay close attention to the notes you use in your solos, so you can always convey the particular emotions you want – instead of mindlessly playing a bunch of memorized licks/patterns and waiting for something to sound good (like a lot of guitar players do).
It will be easy to play with accurate self-expression in your music, when you learn how to turn normal guitar solo licks into awesome guitar solo licks.
When you have the power to make any note sound incredibly expressive and can control the emotions of each note over specific chords, your guitar solos will become like an extension of your soul – making your playing sound highly creative and unique.
To get additional ideas on for how to write and play emotional guitar solos, read this page with methods for playing guitar with emotion.
Guitarists often complain about how their lead guitar licks don’t sound as good as they want. Truth is, there could be countless reasons why this occurs, however there are very precise ways to solve every problem. Here are some of the most frequent problems I notice in most lead guitar solos and licks:
Not using ‘any’ vibrato during your solos (or using out of tune vibrato)
Using very narrow (or no) vibrato to begin your solos – causing them to feel ‘weak’ and uninspiring
Adding vibrato to every note you play in the exact same manner
Before you learn how to use vibrato to enhance your guitar solos and licks, it is important that you SEE and HEAR how this technique can improve your solos. Do this now by checking out the video below:
Use the points below to build a solid foundation for great vibrato technique and use it to enhance your solos:
1. Play Vibrato That Is Perfectly In Tune
Nothing will kill the sound of a great guitar solo faster than vibrato that is out of tune. For this reason, it is crucial that you always play your vibrato in tune! To do this, always bend the string up to the exact pitch you are targeting and back down to the original pitch you began on before releasing it. So if you wish to apply vibrato that is a whole step wide, you need to bend the string to match the pitch 2 frets above the starting note before returning it back down to the pitch you started with (and repeating this many times quickly to achieve a vibrato effect).
Hear what out of tune vibrato sounds like compared to perfect vibrato by listening to the examples below:
How To Use This Concept To Improve Your Guitar Solos Right Now:
Determine how wide you want your vibrato to be (such as a half step or whole step). Then invest time into applying this vibrato to different notes in different locations all over the fretboard while keeping it in tune. To speed up the mastery process, record yourself playing so you can pinpoint times when you were playing out of tune and understand the changes you need to make to correct this.
2. Use Vibrato In Many Different Ways
You must gain control of two main variables in order to play great vibrato:
1. The way the vibrato sounds (affected by how wide the vibrato is and how fast the pitch fluctuates)
2. The timing of when the vibrato is used after a note is played.
In most cases, guitar players apply ‘narrow’ vibrato to a note ‘immediately’ after they play it (every time). If you use vibrato in this manner every time you play a note, it will quickly become less interesting (achieving the opposite of what you want).
To make your guitar solos sound creative and inspiring, use vibrato in a different way by ‘delaying’ its application for a few moments. This will add additional interest to your playing in the form of musical tension, while also extending the life of the note.
Here is the difference between the conventional approach of instantly applying vibrato vs. delaying it:
To make your soloing sound even more unique, after delaying the vibrato, pick the string again (with a lot of power) to emphasize/re-articulate the note. Here is what this sounds like:
Example 3 – Delayed Vibrato + Striking The Note Again: Hear It
Example 4 – Here is a short example of how to combine the three different vibrato types discussed above by using various levels of intensity/speed: Hear It
How To Use This Concept To Improve Your Guitar Solos Right Now:
Pick out one of your favorite guitar licks and look for the notes in that lick that are sustained longer than the others. Next, record yourself playing the lick for 5 minutes straight while applying vibrato to these longer notes as follows: ‘instantly’ applying it as soon as you play a note, ‘delaying’ it for a moment or two after playing the note and ‘delaying’ it + striking the string again. Focus on using as much variety as you can throughout your recording to develop mastery for all 3 vibrato types.
3. Adjust The Depth Of Your Vibrato To Make It Appropriate For Any Musical Context
If you always begin the first note of your guitar solos with narrow vibrato (of a depth that is less than 1/2 step) your playing will sound soft. This sound is ‘sometimes’ appropriate, but sometimes it simply makes your playing sound ‘weak’. To have more expressive options in your soloing, learn to use wide vibrato on the very first note to add a powerful punch to the phrase! To do this, use vibrato that is at least a width of 1/2 step or one whole step (while keeping it in tune). This is not ‘required’ for all solos of course, but you should make sure you are not always beginning your solos with narrow/no vibrato.
Check out the audio samples below to hear the difference between narrow, wide and ‘extra wide’ vibrato:
Example 1 – Narrow Vibrato (less than a half step): Hear It
Notice: Using narrow vibrato can certainly sound good when you are doing so in the right context – The mistake you must avoid is ‘only’ using narrow vibrato because you are unable to play wide vibrato that sounds good/stays in tune.
Example 3 – Extra Wide Vibrato (whole step): Hear It
Note: Using vibrato wider than 1/2 step isn’t always the best choice over a more narrow vibrato. When you use vibrato in your solos, focus on matching the width and intensity of your vibrato to match the musical context. Being able to play wide vibrato gives you the option to add ‘intensity’ in musical situations that require more tension (this cannot be achieved by using narrow vibrato which is much more subtle). By mastering both narrow and wide vibrato, you will gain the ability to freely express yourself with the technique under any musical circumstance.
How To Use This Concept To Improve Your Guitar Solos Right Now:
Step 1: Think of two to three small guitar licks. For each lick, make the first note ‘longer’ in terms of duration (such as a half note or longer).
Step 2: Use half or whole step vibrato to enhance the first note in each of these licks.
Step 3: Repeat the previous step for several minutes. Practice this for a couple of weeks until you have developed your vibrato technique to a high level. Once you’ve done this, you will be able to effortlessly apply this idea during any guitar solo.
The ideas in this article will help you to quickly improve any normal guitar lick or solo to make it a truly great one. However, there is much more you can do to create killer guitar solos. In part two of this article, you will discover how bends can be used to make your solos sound even more unique and creative!
Do you want to become a better shred guitar player? Don’t make the mistake of listening to other guitarists who say you must only learn how to ‘play faster’. These players are unable to play tons of interesting shred guitar ideas because they ONLY think about playing as fast as they can and lack the creative mindset needed to play truly inspiring licks. Although playing fast is part of making cool shred licks, you must also understand ‘how to use’ the notes in your phrases to make them grab the attention of anyone listening.
You are about to learn an effective lead guitar method that will immediately enhance your shred guitar licks and make your lead guitar playing much more intense and awe-inspiring. Begin by checking out the shred guitar video on this page before you read any further (By doing this, you will be able to integrate all of the concepts on this page into your playing to instantly play much better shred guitar licks).
Ok, now you have seen the demonstration in the video above and are ready to apply what you have learned.
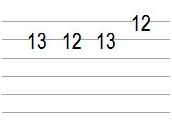
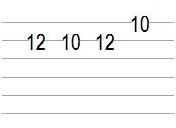
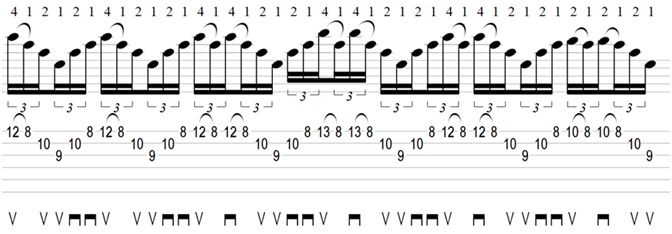
First Step: You are going to begin this exercise by using a common three string A minor arpeggio. Anytime you play through the pattern, make sure to use a ‘pull off’ when you are descending from the highest note to the second highest note. So for an A minor arpeggio in second inversion, you will pull off from the E on fret number 12 to the C on fret number 8 each time you descend in the pattern. Here is what this looks like:
Second Step: Play the pattern from step one a few times at a speed you are accustomed to.
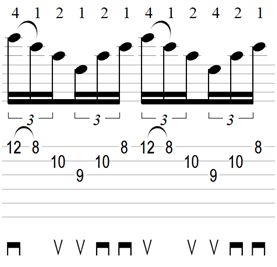
Third Step: Once you have played through the pattern from step one a few times, start repeating the highest two pitches every time the pattern begins again (as you saw me do in the demonstration above). For example, while playing the A minor pattern (A C E), the highest pitches are E on the twelfth fret and C on the eighth fret. Each time you play the arpeggio, repeat these two pitches as you are descending like this: E to C to E to C. Then keep playing through the pattern. As you observed in the video above, once you add these two extra notes you completely alter the contour of the musical phrase. This accents the notes in the lick in a much different way, giving the lick a new feel in comparison to the original one. This simple alteration will immediately change your shred guitar licks, making them sound totally killer. See the example below:
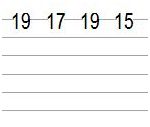
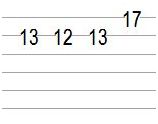
Fourth Step: After repeating the new idea from the previous step, you are going to start creating additional variations of the original lick. To do this, simply change the pitch of the highest note in the arpeggio. For instance, if the highest note is an “E” (on the 12th fret), change it to an “F” or a “D” note instead. Then repeat the same idea from the previous step to pull off from the new note onto the second highest note of the pattern (which remains the same as before). Play through these new variations several times.
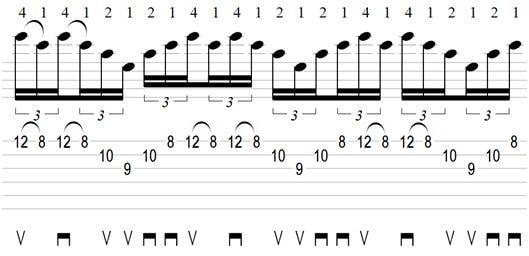
Fifth Step: Play the original arpeggio lick from the first step and combine it together with the new variations you thought up just now. You will notice a MAJOR increase in the tension level and intensity of the new licks when compared to the original one. Look below to see one possibility of what you can come up with:
After completing this exercise, start to combine the concepts discussed with different kinds of licks (scales, tapping, rhythm ideas, etc.) So instead of using only an arpeggio pattern, use any type of lick in its place and integrate the idea of ‘changing contour’ into your playing to make it much more intense. Then begin creating countless shred guitar licks by completing steps two through five of the exercise above. This will not only give you tons of new shred guitar ideas, but make you a much more creative guitar player in the process!
About The Author: Tom Hess is an online electric guitar teacher, recording artist and virtuoso guitarist. He trains guitar players from around the world how to reach their musical goals in his correspondence guitar lessons online. Visit his website tomhess.net to receive many free guitar playing resources, mini courses, guitar practice eBooks, and to read more articles about guitar playing.
Tired of playing bland, repetitive sweep picking arpeggios? Although there are many guitarists who can sweep pick, there are only a few who can use the technique to creatively express themselves. In this article, I will show you an exercise that will help you not only become a better sweep picker, but understand how to transform any arpeggio into an incredible lead guitar lick that demands attention.
To use sweep picking as a tool that will ‘enhance’ the expression, you MUST avoid the following: only thinking about speed while playing sweep picking arpeggios. Why should you avoid this? When you only (and always) try to play an arpeggio lick as fast as you can, you sacrifice the musical quality of the lick for speed. The result of this is a continual stream of the same notes being played over and over – making your sweep picking licks sound like boring ‘exercises’ instead of awesome phrases. To play inspiring sweep picking arpeggios that demand the attention of others, you must play with speed and precision while ALSO building up an overwhelming feeling of tension.
With this in mind, I am now going to show you an exercise that will help you change any arpeggio into a powerful tool for expressing intensity in your guitar licks. That said, you don’t have to be a master lead guitar player in order to use the idea I will be teaching you. Get started by checking out this sweep picking arpeggios video to get the maximum benefit from the exercise below (it will help you understand precisely what you are supposed to be doing):
… Did you watch the video already? If not, watch it now (you’ll be glad you did). If you did watch it, continue reading the steps in the exercise below.
1. Select any given three string arpeggio pattern that you are able to play accurately. Play this arpeggio 3-5 times.
2. Now think of the specific note names that build the arpeggio you just played. Ex: If you picked out a C minor arpeggio, this arpeggio is made of notes C, Eb and G.
3. After watching the demonstration in the video, you found out that you can build powerful intensity by inserting silence before the next note in an arpeggio. While watching the video to see how this is done, play the arpeggio you picked from step one several times. Then after you have repeated the pattern enough times, immediately mute all the strings after you play the highest pitch of the arpeggio.
4. In this step, you will simply be ‘waiting’ a few moments in order to insert silence into your lick and begin building musical tension. As you are doing this, find one of the notes from the arpeggio you picked that is higher in pitch than the note you ended on in the previous step. Ex: If you picked a C minor arpeggio and you ended your phrase on a ‘G’, find one of the other notes of the arpeggio (C, Eb or G) that are higher in pitch on the fretboard. Do not play this note yet.
5. Next, play the note you selected from the previous step in order to release all the tension you built up. Finally, add incredible power to the entire phrase by using wide vibrato to accent this note. After doing this, you have successfully made a single variation of the sweep picking arpeggio pattern you began this exercise with.
6. Once you have completed steps one through five, you have created a new sweep picking lick (that is different from the original lick you started out with). Experiment with various new approaches by using the other phrasing ornamentations I demonstrated in the video above.
Do steps 1-6 with at least three different arpeggio patterns. After repeating this exercise several times, you will see a huge improvement in not only the overall intensity in your sweep picking arpeggios, but the quality of your lead guitar playing as well. Become a great lead guitar player by using the concepts in this free electric guitar licks video.
To improve your speed on guitar and have more creative freedom when applying your phrasing skills, study this free mini course on guitar speed development .
About The Author: Tom Hess is an online electric guitar teacher, recording artist and virtuoso guitarist. He trains guitar players from around the world how to reach their musical goals in his correspondence guitar lessons online. Visit his website tomhess.net to receive many free guitar playing resources, mini courses, guitar practice eBooks, and to read more articles about guitar playing.
by Andrea Basiola
When we think of guitar effects, we think of devices that can enrich our sound, embellish it,
or simply create different tones in order to make a song more interesting and captivating.
Sometimes musicians keep on looking for the perfect tone, they get loads of effects
thinking that the more pedals you have the better you are at playing guitar.
The most effective, simple and reliable pedal that a guitarist can show on his pedal board is
without doubt the Wha pedal.
From Jimi Hendrix,to Eric Clapton, to Zakk Wylde, to Van Halen, each of these musicians
used the wha wha to build their own sound and each of them had their own way of using it.
If we think about it, the concept is fairly simple, when we engage the pedal and push it
down, we basically alter the tone, getting what we call the “wha” sound.
It looks quite easy and we might think: “is that it? is that the only sound we can get?”
The answer is no, in fact this can be one of the most versatile and complete pedals, if we
know how to use it correctly and how to get the most out of it.
That’s exactly what I’m going to do you in this demonstration.
I will give you some examples of different ways of using the wha, and you’ll notice that by
doing that, not only you’ll give expression and dynamics to your playing, but also the fact
of creating new tones will inspire you in creating more music (at least that worked for me).
EXAMPLE 1 : WHA WITH A CLEAN SOUND.
The first example is done by playing on a clean sound.
Let’s take a famous riff, like the one in “Superstition”by Stevie Wonder.
We can move the wha while playing the riff, pushing down
the pedal on every beat, like if I we were stomping the foot to the beat.
This is probably the most common of the techniques of using this pedal,
and you can do that also while playing a rhythm part, in this case we take a
Em7 chord voicing. The wha will make it a lot more funky and groovy.
EXAMPLE 2: FINDING THE “SWEET SPOT”
The second example is about finding what they call the “sweet spot”.
This works best with a distorted and gainy sound.
A lot of famous rock guitarists, including Michael Schenker and Zakk Wylde
use this method, which consists of slowly pushing down the pedal and
leave it in a stable position once we found the tone that we like.
By doing this, you can get the tone you want and also you will considerably
cut through the mix of the band when playing riffs or solos.
Be careful though, because the wha is very responsive, and if you move it
slightly you will immediately change your tone, so you need to be very
accurate and precise. That depends, of course, on the sound you want to
achieve.
EXAMPLE 3: USING THE WHA TO EMULATE VIBRATO AND FLANGER.
Another interesting way of using the pedal is to move it very fast in order to
get a vibrato effect.
Let’s say you are playing a chord and you would like a bit more of
expression, but you don’t have a tremolo effect.
By moving the pedal quickly up and down you can get a very similar sound
to that.
On the other hand, if you are playing a riff and while doing that you move
the pedal up and down very slowly, you get something very similar to a
flanger, with the advantage that you can control your tone.
EXAMPLE 4: THE WHA FOR SCREAMING SOLOS.
This is probably every guitarist’s favorite use of the wha wha.
The guitar solo is the moment where we shine, where we want to cut
through and get heard.
By using the wha , we change the frequency of the sound,
getting more middle or treble and consequently emerge from the band.
If we do this we can make our solos really “scream”.
These are just 4 examples, but you can create more and more, depending on what style
you play and what tone you want to get.
Don’t worry the if you don’t have many effects,sometimes you don’t need them (unless you
are playing a specific style of music), you can always get good tones out of a few pedals;
you just need to know how to use them properly and take advantage of every little nuance.
Remember to keep experimenting! In order to create your sound and voice, you have to
play and play until you are satisfied with that. It might take time, but at the end of the day
music is a never-ending journey, there’s always something new to learn.

 symbol means “downstroke”, while
  means “upstroke”):